WCC Soil Moisture Sensor
Overview
Age Range: First time using external devices for the micro:bit
Students will learn how to program an external moisture sensor with the micro:bit. They will learn how to take values from the sensor and turn them into meaningful data to which an output can be created.
Students will create a soil moisture sensor that gives a percentage value of the moisture level of a plant’s soil.
Aims
- Learn how to get values from an external sensor and turn them into meaningful data.
- Understand how variables work.
Download the Code
MakeCode Editor
Click the button below to download the MakeCode editor code for this lesson. The hex file is contained in a zip folder.
Kindly refer to our download the code page for instructions on how to upload your code onto the micro:bit. Please use instructions set A.
This code can also be uploaded into the MakeCode editor.
Kit Required
Micro:bit

Soil Moisture Sensor Kit
- Plant
Assembly
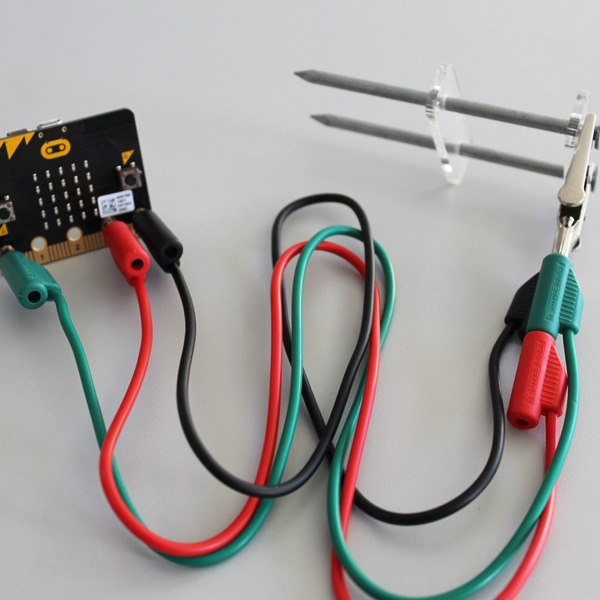
- Insert the two nails into the acrylic spacer until the spacer is around 5mm from the nail heads.
- Insert the red/black 3V cable into the back of the green input cable.
- Attach a crocodile clip to the green input cable and the black GND cable. (Crocodile clip should be attached to the green input cable on the end with the red/black 3V cable attached). See image.
- Insert the 4mm cables into the micro:bit as described below.
- Green to P0
- Red/black to 3V
- Black to GND
- Insert the nails about 50mm into the soil that you wish to use.
- Attach the cables via the crocodile clips onto the heads of the nails as described below.
- Green and red/black to Input 3V
- Black to GND
Preparation
- Connect the micro:bit to a computer via the microUSB cable.
- Go to the MakeCode website on your computer and open a new project.
Time to Code
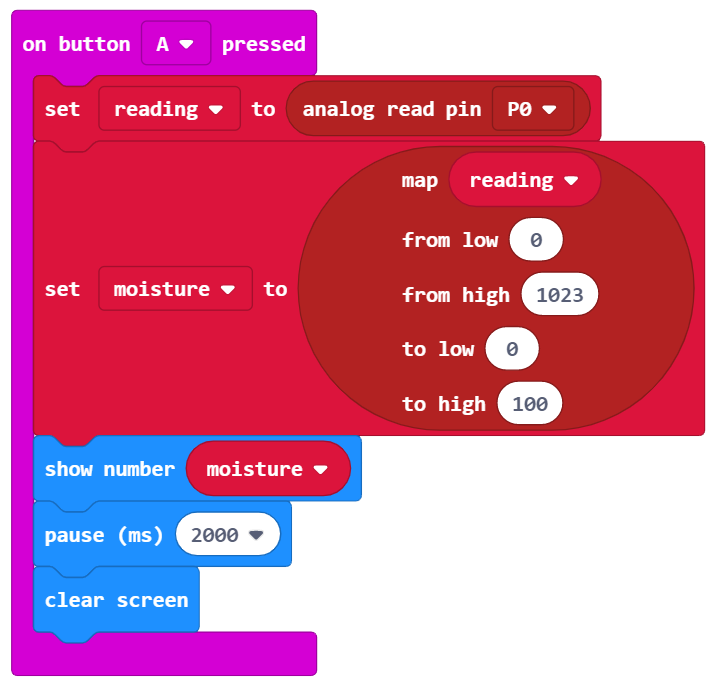
As you go through these steps please note that there are images of the completed code to the right.
- The first step to coding the moisture sensor is to create an input. Select the ‘on button pressed’ block from the ‘input’ tab and choose button A from the drop down.
- The next step is to create the first variable. This variable will be the value taken from the moisture sensor. Go to the ‘variables’ tab and ‘create a variable’ called reading.
- Then, select the ‘set reading’ block from the ‘variables’ tab. Insert this block into the ‘on button pressed’ block.
- The moisture sensor is connected to ADC1 which connects to P0. Now, select the ‘analog read pin’ from the ‘pins’ tab and insert it into the ‘set reading’ block. Ensure P0 is selected from the drop down.
- Now, create a second variable called moisture. Select the ‘set moisture’ block from the ‘variables’ tab and insert it underneath the ‘set reading’ tab. This variable is used to convert the moisture value into a percentage reading.
- To make this conversion the ‘map’ block needs to be used. This block can be found in the ‘pins’ tab. Insert the ‘map’ block into the ‘set moisture’ variable block.
- Select the ‘reading’ variable block for the ‘variables’ tab and insert it into the ‘map’ block. The reading variable will return a number between 0 and 1023. 0 being no moisture and 1023 being in water. This range of 0 – 1023 needs to be converted to 0 – 100.
- Type 0 into ‘from low’ and 1023 into ‘from high’. Then type 0 into ‘to low’ and 100 into ‘to high’.
- Now that the moisture has been converted to a 0 – 100 percentage it needs to be shown on the LED matrix. To do this, select the ‘show number’ block from the ‘basic’ tab and insert it underneath the ‘set moisture’ block. Insert the ‘moisture’ variable block into the ‘show number’ block.
- Keep the number on the screen for 2 seconds by inserting a ‘pause’ block underneath the ‘show number’ block. Select 2 seconds from the drop down.
- Finally, clear the screen with the ‘clear screen’ block. This block can be found in the ‘basic’ tab. Insert it underneath the ‘pause’ block.
- The code is now finished! Download the code and upload it onto the micro:bit. The instructions for this can be found on the download the code page. Please use instruction
What Will Happen
When button A is pressed a value will scroll across the LED matrix on the micro:bit. This value is a percentage 0 – 100%. The higher the moisture level the higher the percentage reading.
Taking it Further
- Explore how to condense the code into less blocks.
Keep in Touch
We would love to keep in touch with you and as a result aid you along your digital making journey.
Becoming a digital maker subscriber means you will receive exclusive offers and we will keep you up to date with new resources and kits, as well as upcoming events and workshops.