Freefall
Overview
Age Range: 11 – 14 years old
Students will investigate the freefall of a dropped object by combining classic science educational equipment with digital technology. Students will work in groups of 2 or 3 and will record the data using iLOG.
Aims
- To understand how a dropped object freefalls over time.
- To learn how to use data logging equipment.
- To record and save data.
Kit Required for the Sensor
Micro:bit

- Battery pack
- 2 x AAA Batteries
- MicroUSB Cable
Apparatus Required
- Bubble Wrap
- Duct Tape
- Tape Measure
- Soft landing area
CAUTION
WHEN CONDUCTING THIS EXPERIMENT ENSURE APARATUS IS SECURE AND ANY DROPPED OBJECTS ARE SAFELY CONTAINED TO AVOID DAMAGING EQUIPMENT.
Preparation
The Sensor
- Insert 2 x AA Batteries into the Battery Pack ensuring correct alignment.
- Connect the micro:bit to the Battery Pack.
- Ensure the device is on and receiving power.
Getting iLOG Ready
- If this is your first time using iLOG then we recommend following our Guide to setup the micro:bit for logging activities.
- Once the micro:bit is setup in step 1 you can now configure the datalogging settings.
- First you need to select Collecting Data. We are telling iLOG and the micro:bit we wish to gather data from them.
- Then Select Remote Logging. This allows us to log remotely from the micro:bit powered by the Battery Pack.
- Now we need to select the sensor we have connected.
- Click on the Sensors Box. This will open a new popup window.
- Tick Sensor One and in the dropdown select Acceleration (milli-g).
- Now we need to set how long we want to log for.
- For this experiment we selected 2 Seconds as the time may vary depending on your equipment.
- Now all the configuring is done its time to click Ready.
The Apparatus
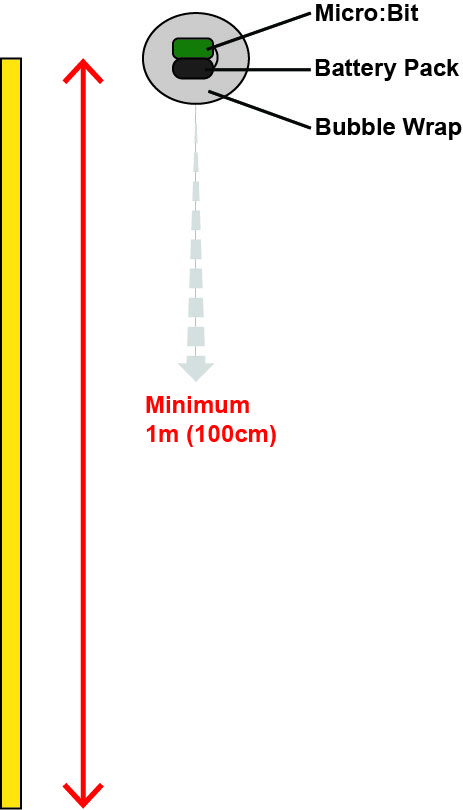
- Use the illustration to set up the apparatus.
- For securing the micro:bit and battery pack use bubble wrap or a suitable alternative and an adhesive component such as Duct Tape.
- Ensure that the wrapping around the micro:bit does not obstruct your access to the micro:bit reset button.
- Ensure that the wrapping around the micro:bit does not obstruct your access to the micro:bit “a” button.
- Ensure that the freefall landing area is not obstructed.
- Ensure that the micro:bit is dropped from a fixed height of no less than 1m (use the tape measure to obtain a consistent height for each attempt).
- Ensure that the dropped micro:bit does not fall directly onto a hard surface by placing a Soft object such as a pillow in the freefall landing area.
Datalogging
Now you should have everything setup and ready to go. Below is a check list make sure you are happy and have everything ready to go.
- Micro:bit setup with Battery Pack connected.
- Access to the micro:bit “a” and reset buttons.
- iLOG on its main graphing screen with Remote Logging configured.
- Apparatus setup as per the diagram.
- A suitably contained freefall landing area.
If the above points are all done, then Datalogging can begin.
Activity
- Press the micro:bit “a” button to begin logging.
- You will start to see plots appear on the graph.
- You will also see its current G reading appear in the bottom right.
- If it is plotting data and displaying the current distance value should be no less than 1000 milli-g.
- Prepare to release the micro:bit quickly from the measured height of >1m once logging has begun.
- Release the micro:bit.
- Once the micro:bit has come to a stop ensure that you click stop in iLOG if logging has not ended in time.
Taking it Further
- Conduct an investigation into the effects of variable distance into the acceleration of a freefalling object.
Keep in Touch
We would love to keep in touch with you and as a result aid you along your digital making journey.
Becoming a digital maker subscriber means you will receive exclusive offers and we will keep you up to date with new resources and kits, as well as upcoming events and workshops.
Let us know how your digital education journey is progressing. Send us pictures and videos of your awesome creations and use the hashtag below.